Credentials & Roles, Teams, and Agents#
These Config pages control who can call OptScale AI and which limits, providers, and compression settings apply.
Register provider connections under Config → Providers before assigning provider access.
Credentials & Roles#
Open Config → Credentials & Roles to manage organization users:
- Invitations
- Usage limits
- Team assignment
- Allowed providers
- MCP servers
- Context compression
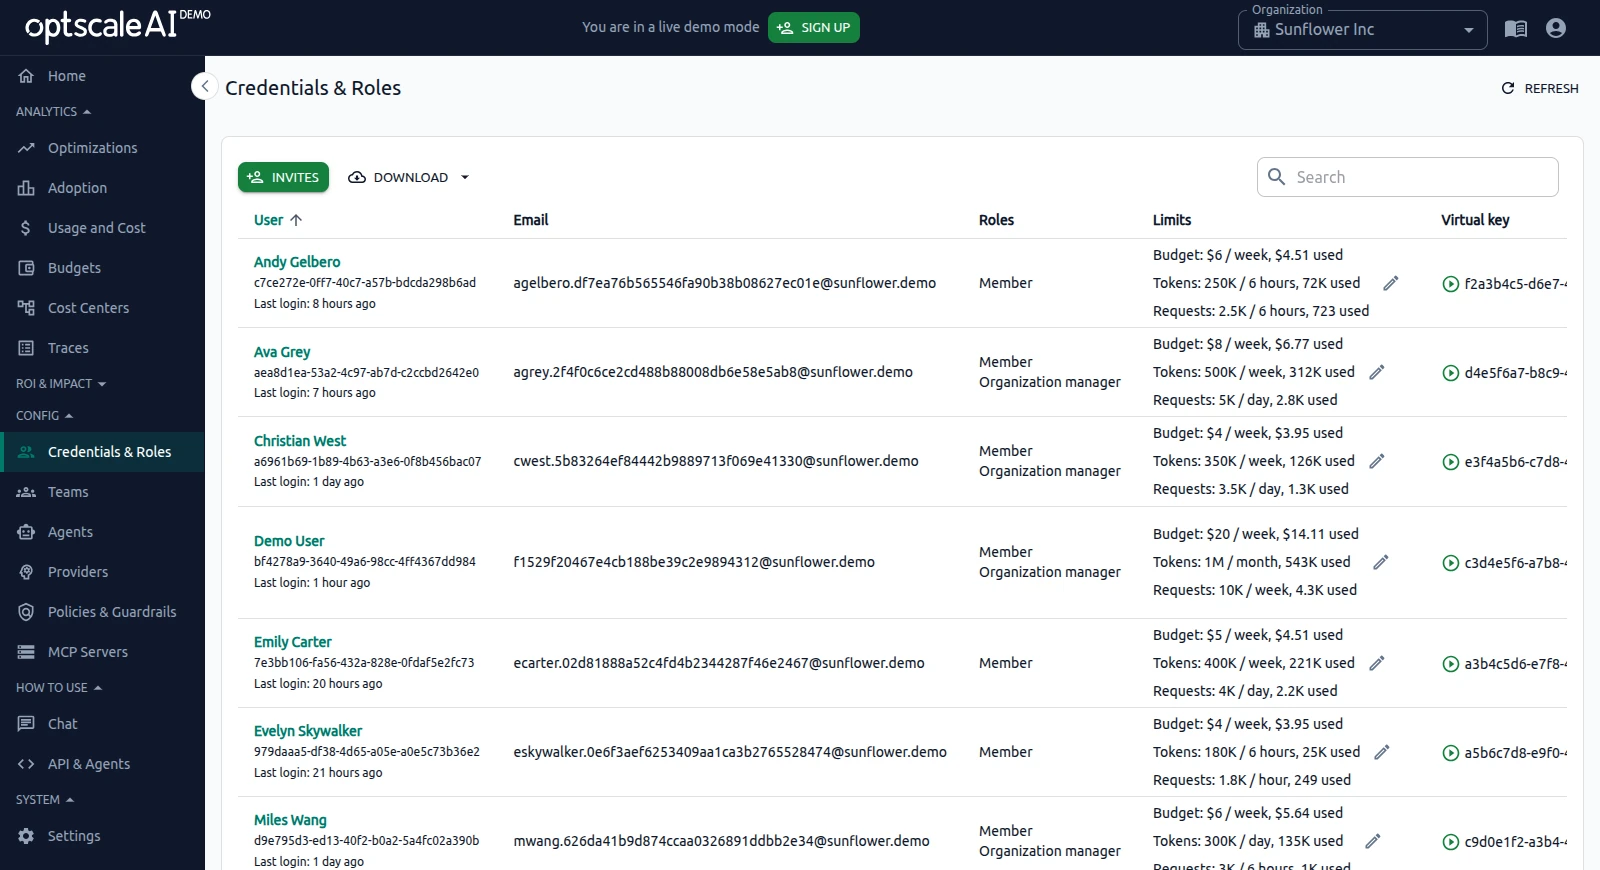
Click a user to open their details and configuration.
If an invited user has accepted the invitation but does not appear in the list, click REFRESH in the page header to reload the table.
User onboarding workflow#
To onboard a user:
2. Configure access and settings After the user accepts the invitation, configure one or more of the following settings:
- Set usage limits.
- Assign the user to a team.
- Configure allowed providers.
- Confirm the user's MCP servers.
- Enable or disable context compression, as needed.
3. Verify access - Ask the user to sign in. - Confirm that the expected providers and tools are available.
Manage invitations#
Open Config → Credentials & Roles and click + INVITES to monitor invitations that have not yet been accepted.
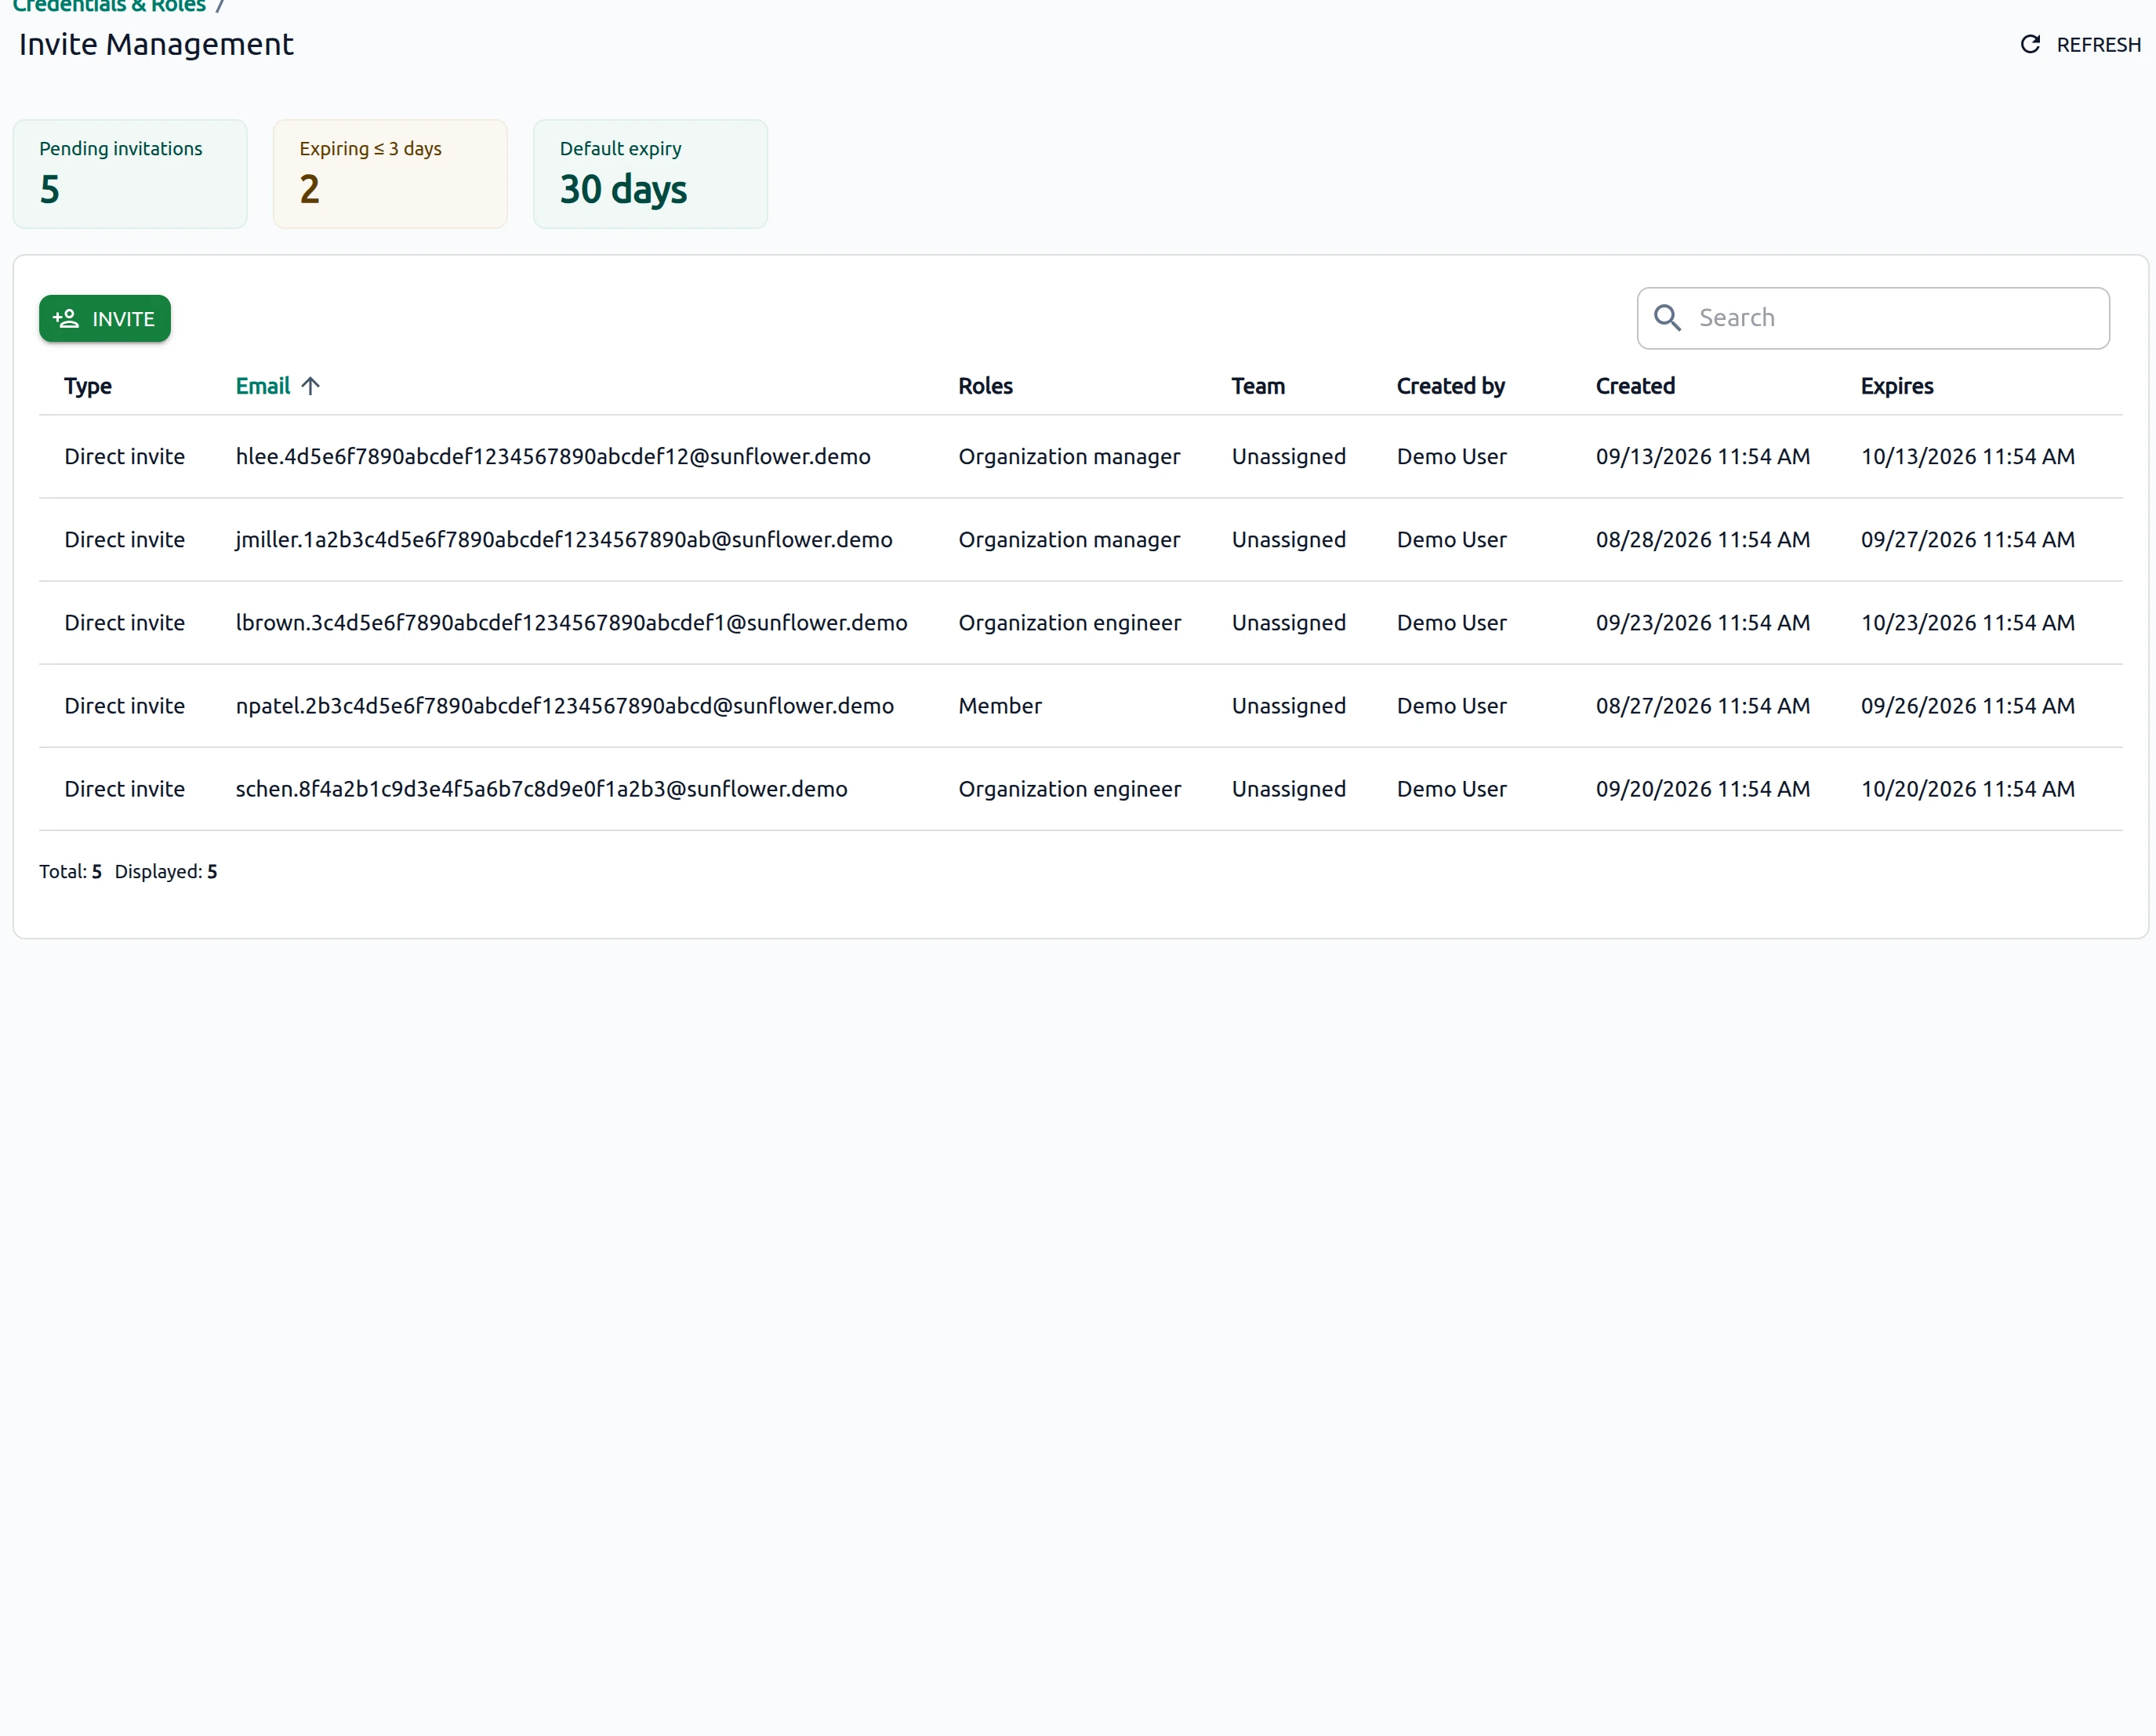
The page shows the number of Pending invitations, the list of invited users, invitation details, and actions such as Resend.
For information about roles and invitation restrictions, see Access principles.
Invite users#
To invite new users to the organization:
- Open Config → Credentials & Roles and click + INVITES to open Invite Management.
- Click + INVITE.
-
On the Invite Users page, enter the email addresses and select a role.
- Email — Enter one or more email addresses.
- Add role — Select a role.
-
Click Invite.
The new invitation appears in the Invite Management table with Sent and Expires timestamps. After the user accepts, they appear on the main Credentials & Roles user list. Configure any remaining access and settings as needed, including usage limits, team assignment, and allowed providers.
Resend an invitation#
If a user did not receive or has lost their invitation email, resend the invitation.
- Open Config → Credentials & Roles and click + INVITES.
- Locate the user in the invitation list.
- In the Actions column, click Resend.
A new invitation email is sent to the user.
Export user data#
On Config → Credentials & Roles, click DOWNLOAD and choose an export format:
- XLSX spreadsheet — Download the user list as an Excel-compatible file for reporting or offline review.
- JSON file — Download the same data as JSON for automation, backups, or integration with other tools.
The export reflects the users currently visible in the table (respecting any active Search filter).
Configure limits#
Usage limits control maximum spend, token usage, and request count for a user.
For newly added users, the Limits column is empty until an administrator configures at least one limit.
To configure limits:
1. Open Config → Credentials & Roles and locate the user (use Search if needed).
2. In the Limits column, click the  pencil icon.
3. In the Edit limits dialog, configure one or more of the following limits:
- Budget — Specifies the maximum spending limit and its reset interval.
- Tokens — Specifies the maximum number of tokens allowed during each reset period and the reset interval.
- Requests — Specifies the maximum number of API requests allowed during each reset period and the reset interval.
4. Click SAVE to apply the changes, or CANCEL to discard them.
5. Optional: Click CLEAR LIMITS to remove all configured limits for the selected user.
After the limits are saved, the Limits column displays the configured limits, reset intervals, and current usage.
Team and agent limits use this same dialog. Open it from Teams or Agents.
Assign a user to a team#
The Team column assigns users to teams so shared team settings can be applied. For newly added users, the column displays Unassigned (-) until a team is assigned.
-
Open Config → Credentials & Roles and locate the user (use Search if needed).
-
In the Team column, click the
pencil icon. -
In the Assign team dialog, select a team from the Team drop-down list, or select Unassigned to remove the user from a team.
-
Click SAVE to apply the assignment, or CANCEL to discard your changes.
After the assignment is saved, the Team column displays the selected team. To change or remove the assignment, click the pencil icon again and select a different team or Unassigned.
Before assigning users, create the team on Config → Teams.
Allowed providers#
Allowed providers determine which configured provider connections are available to a user.
Configure provider access after adding a provider, when onboarding a user, or when troubleshooting a provider that does not appear in Chat.
Configure allowed providers#
- Open Config → Credentials & Roles and find the user row (use Search if needed).
-
In the Allowed providers column, click the
pencil icon for the user. -
Select one or more Active providers.
- Click SAVE.
Provider access can be assigned when the provider is created or later through Allowed providers. If Assign to new users automatically is enabled for a provider, that provider is automatically assigned to new users.
During initial setup, this step follows Add first provider in First Steps.
Chat shows only Active providers that the signed-in user is allowed to access.
MCP servers#
The MCP servers column lists the MCP servers available to the user. Register servers under Config → MCP Servers.
Context compression#
Context compression reduces the amount of context sent with AI requests to help lower token usage and inference costs.
Configure context compression#
- Open Config → Credentials & Roles and locate the user (use Search if needed).
- In Enable context compression, turn the setting on or off.
The change applies immediately; no separate save action is required.
The same control is available for a team and an agent.
To review savings from compression and other optimizations, see Analytics → Optimizations.
Teams#
Open Config → Teams to create teams and apply shared limits and context compression.
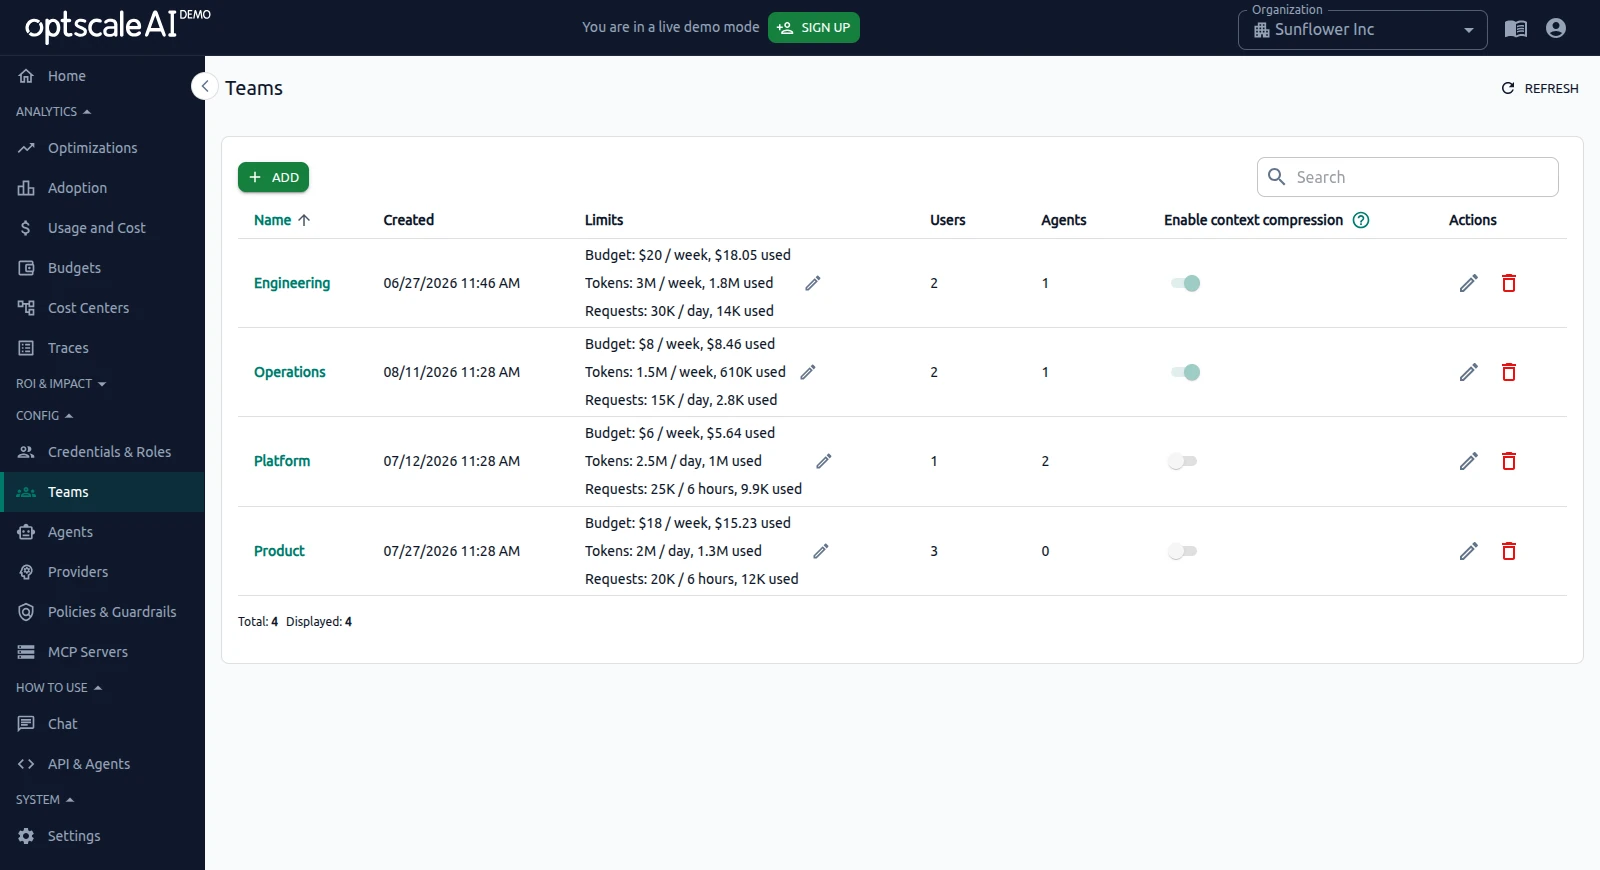
Click + ADD to create a team.
The table shows Name, Created, Limits, Users, Agents, Enable context compression, and Actions. Users and Agents show how many users and agents belong to the team.
In the Limits column, click the pencil icon. The Edit limits dialog uses the same fields as user limits.
In Enable context compression, turn compression on or off for the team. The change applies immediately.
In Actions, click the pencil icon to edit the team, or the  trash icon to delete it.
After creating a team, assign users from Credentials & Roles.
Agents#
Open Config → Agents to register agents that call the gateway.
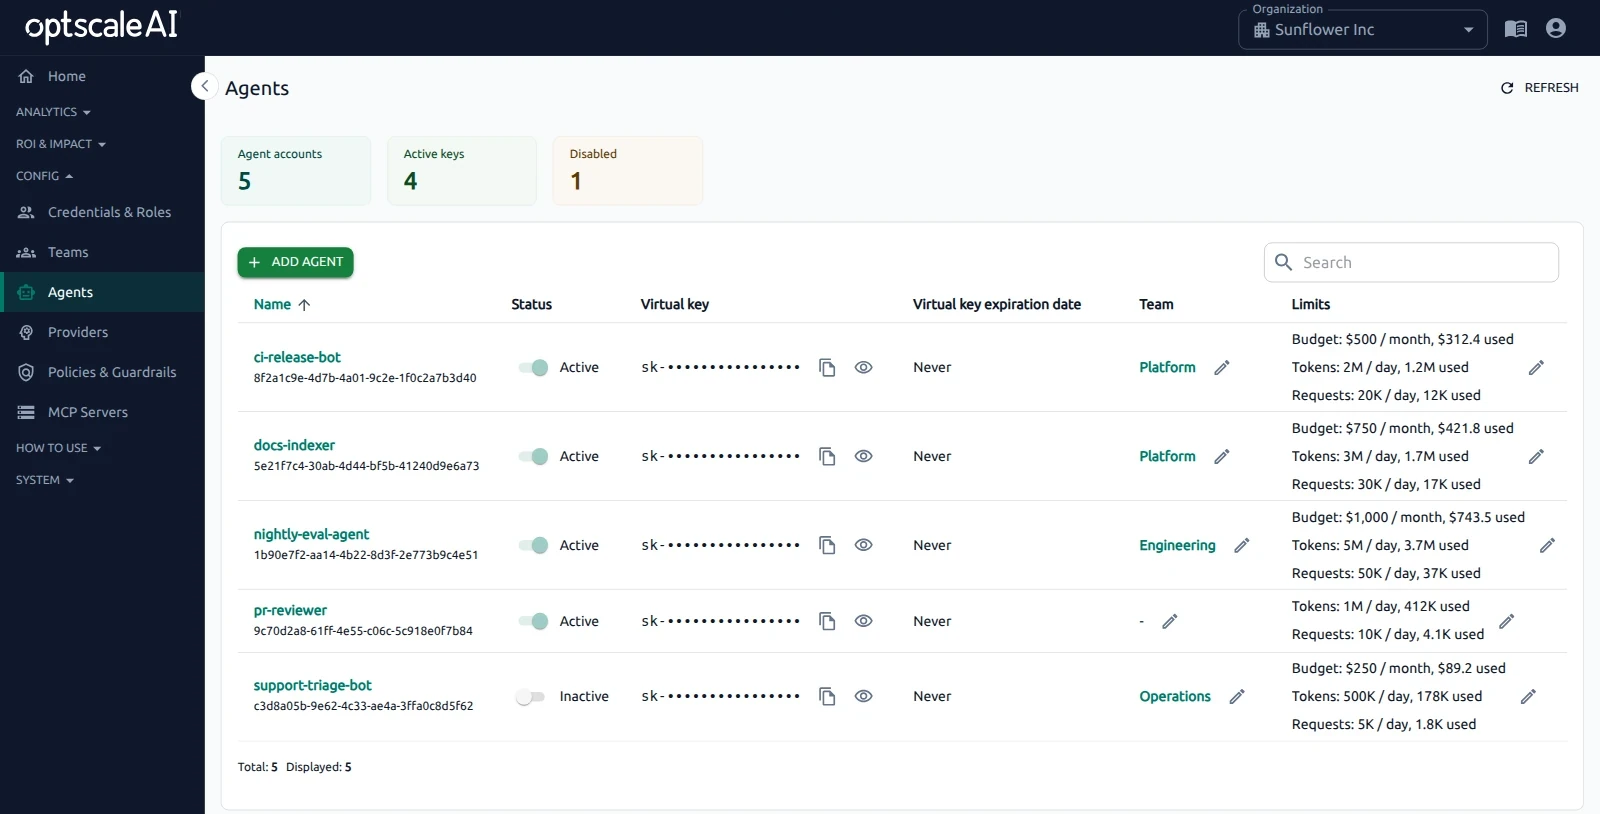
The summary shows Agent accounts, Active keys, and Disabled.
Click + ADD AGENT to register an agent.
The Status column shows Active or Inactive.
The table also includes:
- Team — The team assigned to the agent.
- Limits — Budget, token, and request quotas. Click the pencil icon to open the same Edit limits dialog used for users.
- Allowed providers — Providers assigned to the agent. See Allowed providers.
- MCP servers — MCP servers available to the agent. Register servers under Config → MCP Servers.
- Enable context compression — Turns compression on or off for the agent. The change applies immediately.