Policies#
Open Config → Policies & Guardrails, then select the Policies tab to create and manage policies that determine when linked guardrails run on AI Gateway traffic. The tab lists configured policies and their key evaluation settings.
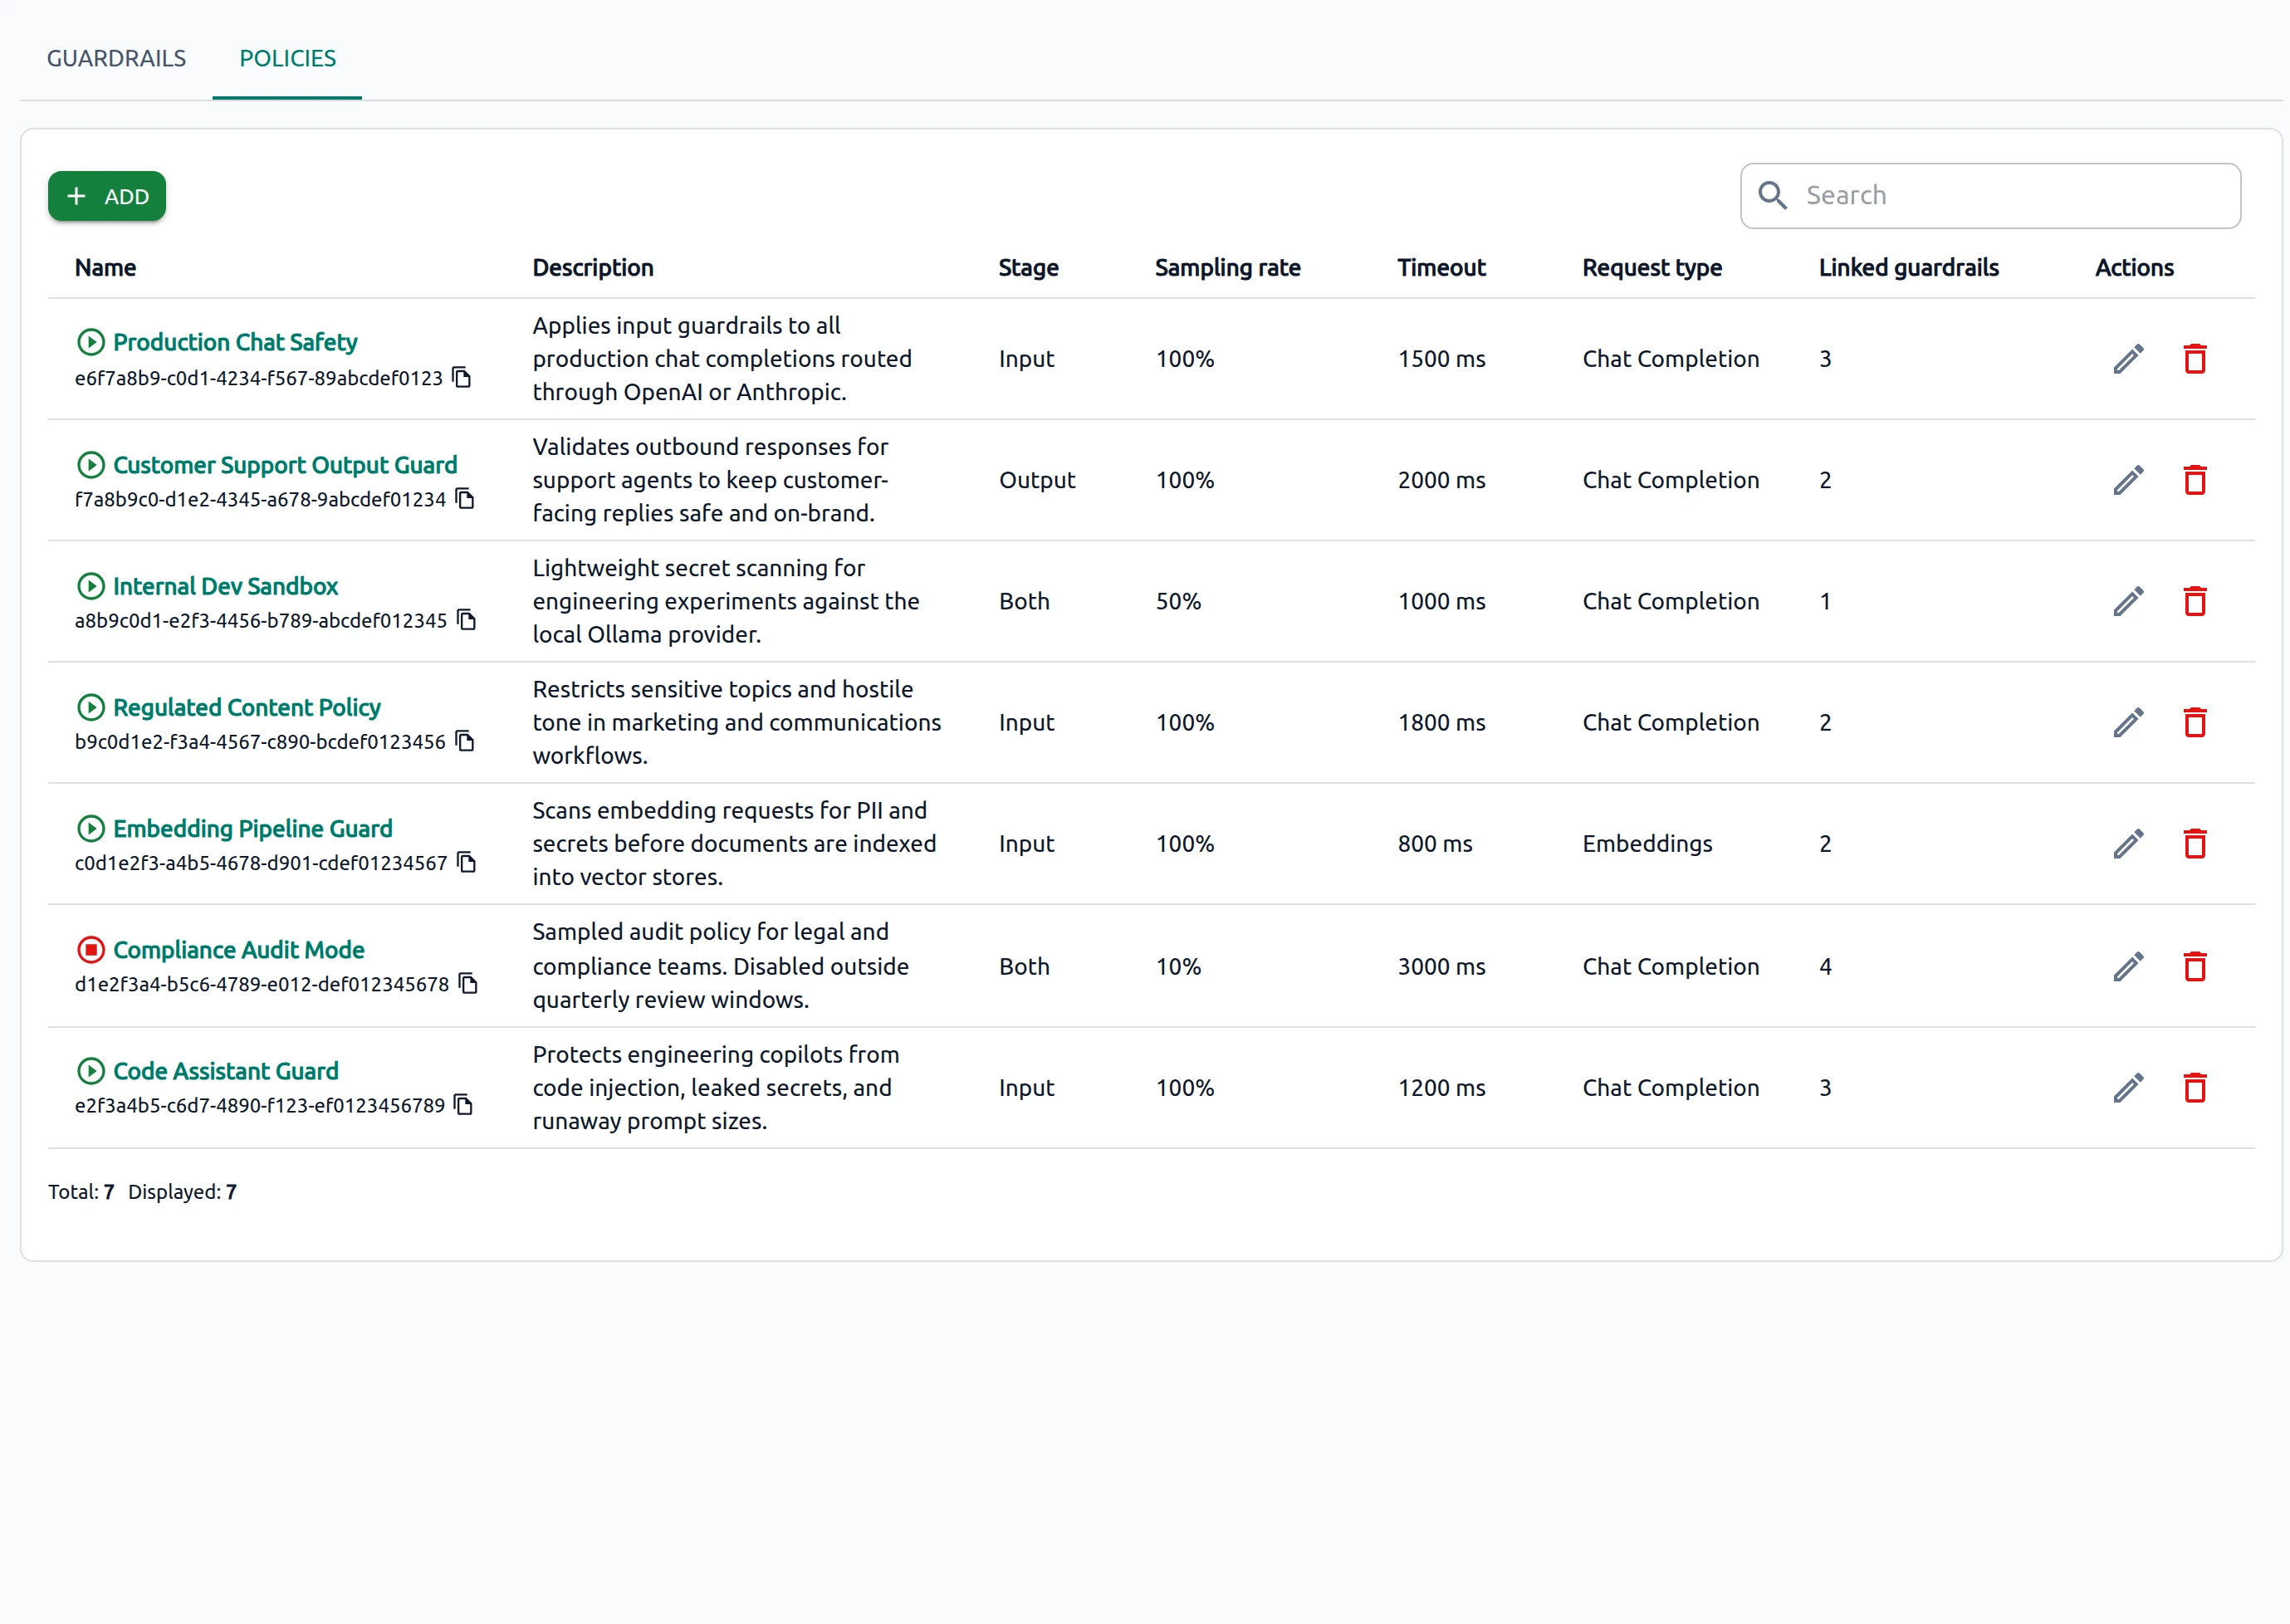
At least one guardrail must exist before you can create a policy.
Overview#
A policy defines which AI Gateway traffic is evaluated, how the evaluation is performed, and which guardrails are applied.
Each policy detail page includes:
- Overview — Policy metadata, evaluation scope, and conditions.
- Linked Guardrails — Guardrails attached to the policy, including their type, stage, and configuration.
- Usage Statistics — Policy activity, evaluations, match and violation rates, latency, bypasses, and guardrail invocations.
Use Usage Statistics to verify that the policy matches the intended traffic and to monitor policy and guardrail activity over time.
For how policies and guardrails work together, see Policy vs guardrail.
Configure a policy#
Before you begin#
Complete these steps before you create a policy:
- An organization is selected in the header.
- At least one guardrail exists on the Guardrails tab. See Add a guardrail.
- Providers are Active with models enabled if you plan to test through Chat or API.
- Identify the Request type used by the traffic you want to evaluate.
- For initial testing, set Sampling rate to
100%so every matching request is evaluated.
Add a policy#
-
Open Config → Policies & Guardrails, then select the Policies tab.
-
Click + ADD to open the Add Policy form.
-
Set Name and optional Description.
-
Turn Enabled on to apply the policy to matching traffic, or leave it off to save the policy without enforcement.
-
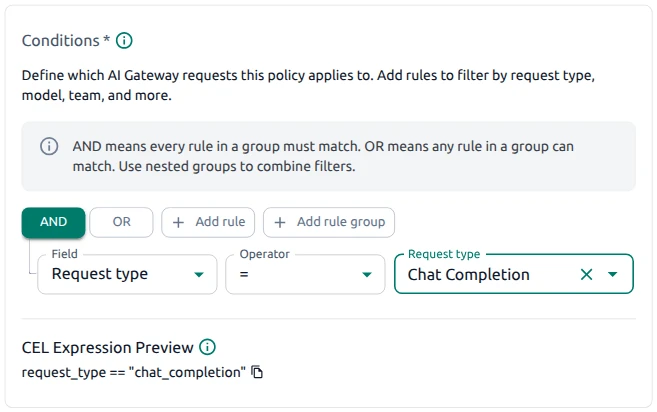
Under Conditions, define which requests the policy applies to.
- AND — All conditions must match.
- OR — At least one condition must match.
- Add rule group — Create nested logic.
Click Add rule to select the field, operator, and value. Review CEL Expression Preview before saving.
Conditions use the same rule-building pattern as routing rules. For examples, see Policy condition examples.
-
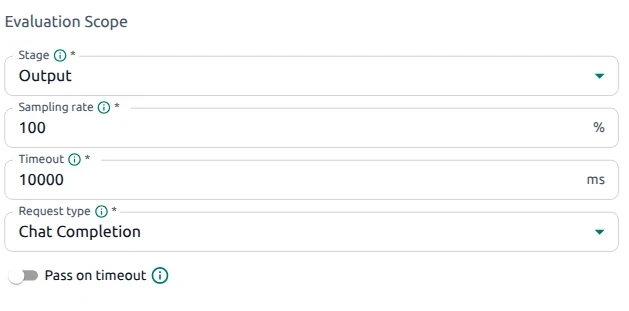
Under Evaluation scope, configure:
- Stage — Select Input, Output, or Both to define when the policy evaluates matching traffic.
- Sampling rate — Percentage of matching requests to evaluate. Use
100%during testing when every matching request should be evaluated. - Timeout — Maximum evaluation time in milliseconds.
- Request type — Gateway request family the policy applies to.
- Pass on timeout — Determines whether the request continues when evaluation exceeds the configured Timeout. See How policy evaluation works.
-
Under Linked Guardrails, select one or more guardrails. Use Show configuration to review the guardrail settings before linking.
-
Click SAVE to create the policy.
Click CANCEL to return without saving.
Guardrail required
At least one guardrail must be linked before the policy can be saved. Create a guardrail on the Guardrails tab first.
For complete policy scenarios, see Use Cases — Apply policies and guardrails and the end-to-end examples.
Policy condition examples#
Use these examples to build Conditions on the policy form. You do not need to write CEL manually; use CEL Expression Preview only to verify the generated condition.
Match all Chat Completion traffic
- In Conditions, confirm AND is selected for the top-level group.
- Click + Add rule.
-
Fill in the fields:
- Field =
Request type - Operator =
= - Value =
Chat Completion
- Field =
-
Check CEL Expression Preview. It should look like:
request_type == "chat_completion"
Match a specific provider
- In Conditions, confirm AND is selected for the top-level group.
- Click + Add rule.
-
Fill in the fields:
- Field =
Provider - Operator =
= - Value =
openai-production
- Field =
-
Check CEL Expression Preview. It should look like:
provider == "openai-production"
Match Chat Completion traffic for one model
- In Conditions, confirm AND is selected for the top-level group.
- Click + Add rule.
-
Fill in the first rule:
- Field =
Request type - Operator =
= - Value =
Chat Completion
- Field =
-
Click + Add rule again in the same AND group.
-
Fill in the second rule:
- Field =
Model - Operator =
= - Value =
gpt-4o
- Field =
-
Check CEL Expression Preview. It should look like:
request_type == "chat_completion" && model == "gpt-4o"
Verify policy#
Verify that the policy matches the intended traffic and runs the linked guardrails:
- Open Config → Policies & Guardrails → Policies. Verify that the policy is Enabled and shows the expected number of linked guardrails.
- Open the policy detail page and verify that Conditions, Evaluation scope, and Linked Guardrails contain the expected configuration.
- Send several Chat or API requests that match the policy Request type.
- Open Usage Statistics and verify that Requests evaluated, Match rate, and Guardrail invocations show activity from the test traffic.
- In Traces, confirm that the configured guardrail action is reflected in the request or response. See end-to-end examples.
Policy metrics remain empty until matching traffic flows through the AI Gateway. For sampling, timeout, and observability limitations, see Policy and Guardrail Limits.
Policy checklist#
Before using a policy in production, review the settings that affect coverage, behavior, and performance:
- Linked Guardrails — Confirm that the policy includes all guardrails required for the traffic you want to inspect.
- Stage — Confirm that the policy and guardrail stages provide the intended inspection behavior.
- Conditions and Request type — Make sure the policy covers the intended traffic without matching unrelated requests.
- Sampling rate — Use
100%when all matching traffic must be evaluated. Use a lower value only when intentional sampling is acceptable. - Timeout behavior — Configure Timeout and Pass on timeout according to whether requests should proceed when guardrail evaluation times out.
- Monitoring — Review Usage Statistics and Home after rollout, and be aware of documented limitations.
Troubleshooting#
Policy saved but nothing evaluates
- Confirm the policy is Enabled.
- Confirm at least one guardrail is linked on the LINKED GUARDRAILS tab.
- Confirm Conditions and Request type match real traffic—compare CEL Expression Preview with attributes in Traces.
- Set Sampling rate to
100%during testing. - Confirm policy Stage matches linked guardrail Stage.
Metrics remain at 0 or -
- Send matching traffic after the policy is enabled.
- Confirm users send traffic through the AI Gateway (Chat or API), not direct vendor calls.
- See Observability.
Violations or redaction not as expected
- Review guardrail Threshold and Action on the guardrail detail page.
- Confirm the correct guardrail is linked and its Type matches the risk (PII, Secrets, and so on).
- Check the response or returned content for the expected Redact or Block behavior, and review Usage Statistics for guardrail activity.
Requests blocked or slow
- Review Timeout and Pass on timeout when policy evaluation contributes to request latency or blocking.
- Review the number of linked guardrails and Sampling rate when evaluation latency is too high.
For additional edge cases, see Policy and Guardrail Limits and Use Cases — Apply policies and guardrails.
Manage policies#
Policy details#
The policy detail page contains:
- Summary cards — 24-hour snapshot of requests evaluated, violation rate, bypass rate, match rate, average evaluation latency, and the number of linked guardrails. Metrics may display 0 or - when little or no traffic has been evaluated.
- Overview — Policy definition and evaluation settings, including identifiers, name, state, creation date, evaluation scope, and conditions. Copy controls are available for the identifiers.
- Linked Guardrails — Guardrails attached to the policy. See Linked Guardrails.
- Usage Statistics — Policy activity and guardrail results. See Usage Statistics.
The available control lets you update the policy configuration.
Linked Guardrails#
The LINKED GUARDRAILS tab lists guardrails attached to the policy. Each row shows the guardrail name, type, execution stage, and configuration details.
The Name column links to the guardrail definition. See Guardrail types for the type list. The Configuration column summarizes type-specific settings such as threshold, action, PII fields, and custom patterns.
Usage Statistics#
The Usage Statistics tab shows policy activity, including evaluations, match rate, violation rate, bypass rate, latency, and guardrail invocations.
Use it to verify that matching traffic is evaluated and to monitor policy behavior over time.
Additional panels include Violations by Day, Top Scopes, Violations by Type, and Guardrail Invocations. Guardrail names in Guardrail Invocations link to the corresponding guardrail definitions.
Edit a policy#
1. Open the policy for editing using one of the following options:
- On the Policies tab, in the Actions column of the policy row, click the
 Edit icon.
 - On the policy detail page, click EDIT.
2. Review the pre-populated configuration and update fields described in Add a policy:
- Name, Description, Enabled
- Conditions and CEL Expression Preview
- Evaluation scope (Stage, Sampling rate, Timeout, Request type, Pass on timeout)
- Linked Guardrails
3. Click SAVE to apply changes.
Optional actions:
- Click CANCEL to return without saving changes.
- Use DELETE to remove the policy. See Delete a policy.
Delete a policy#
1. Open Config → Policies & Guardrails and select the Policies tab.
2. Remove the policy using one of the following options:
- On the Policies tab, in the Actions column of the policy row, click the
 Delete icon, or
 - Click the policy name to open the detail page, click EDIT, then click DELETE on the edit form.
3. Confirm the deletion when prompted.
Linked guardrails remain on the Guardrails tab; only the policy and its enforcement linkage are removed.