Routing Rules#
Open Config → Providers → Routing Rules to control how matching Chat and API requests are routed to providers and models.
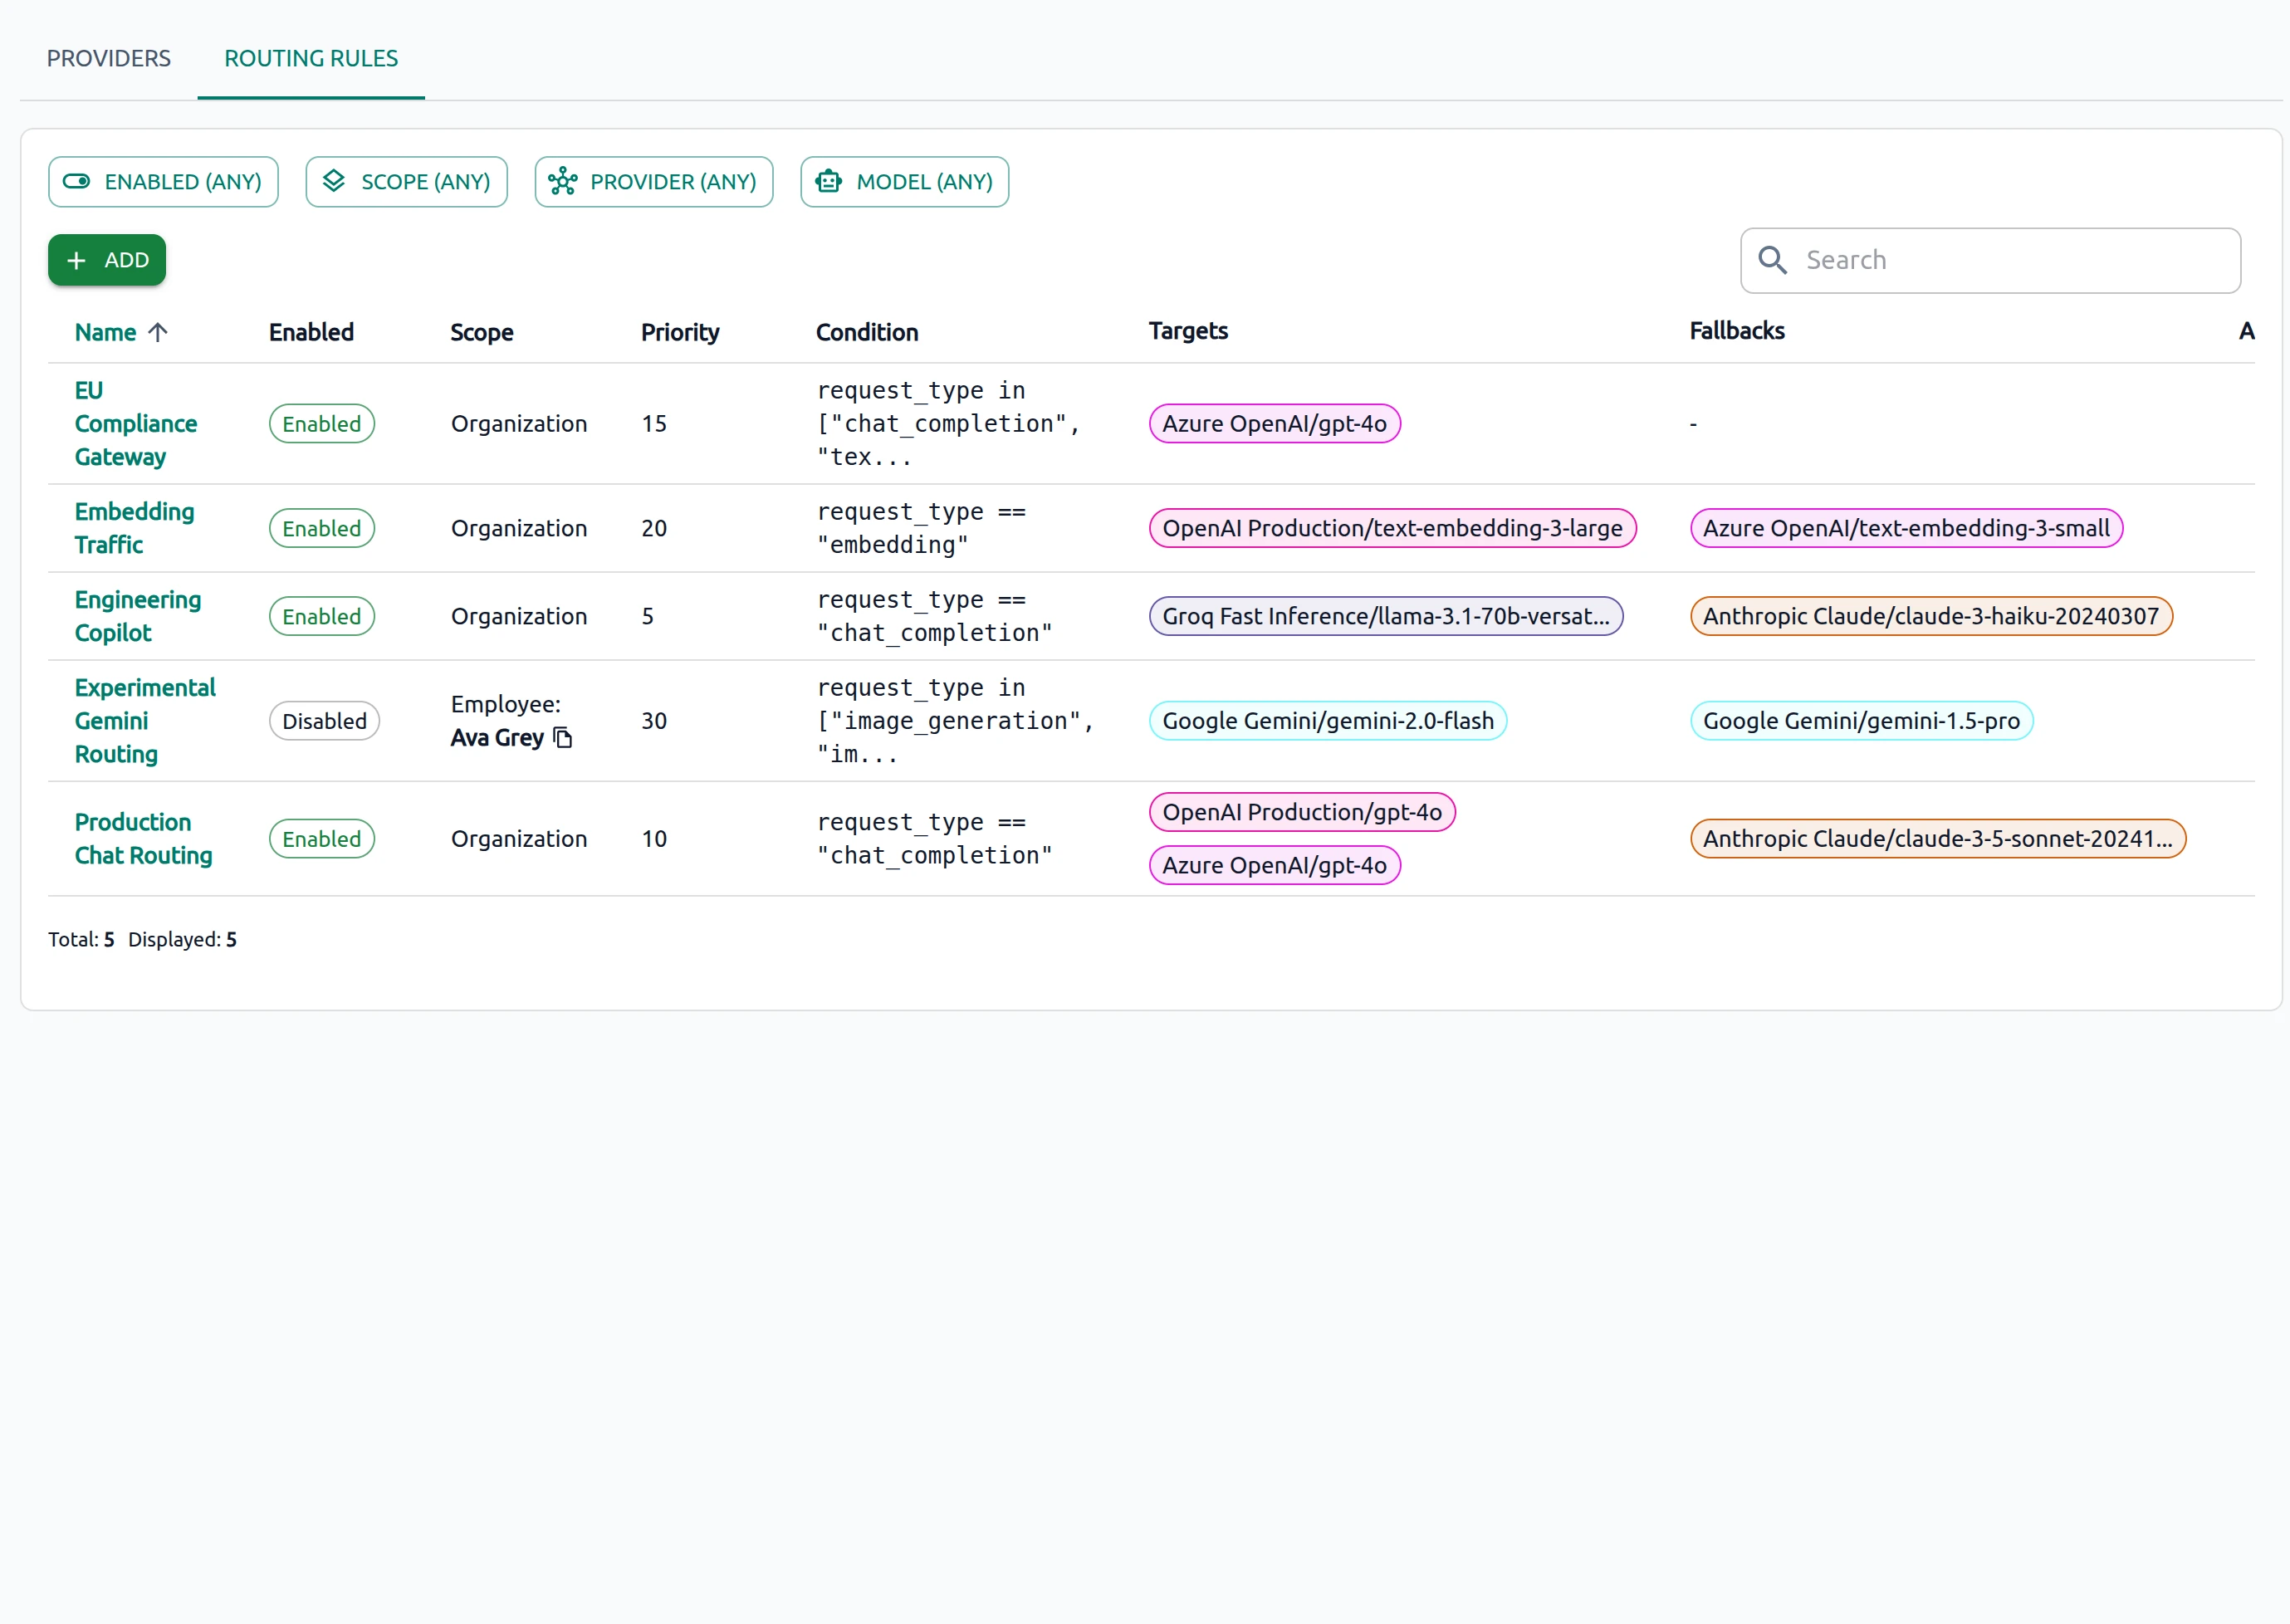
The Routing Rules tab lists existing rules and provides filters by enabled status, scope, provider, and model. Click + ADD to create a rule or select a rule name to open its detail page.
At least one provider must be Active before you configure routing rules.
For worked examples, see Routing Best Practices.
Overview#
When to use routing rules#
Create a routing rule when you need to:
- Route matching requests to a specific provider and model.
- Configure automatic fallbacks if the primary provider or model is unavailable.
- Distribute traffic across multiple provider/model pairs using weighted load balancing.
- Apply different routing behavior based on scope (organization, team, or employee) or request attributes, such as model or request type.
- Change how requests are routed without modifying applications or API clients.
A routing rule is not required when requests should always use the provider and model selected by the user or application. Users choose a provider and model in Chat; API clients specify the model in their requests. The gateway sends the request to that selected provider and model, subject to Credentials & Roles — Allowed providers and the provider's enabled models.
How routing rules work#
For each Chat or API request, the AI Gateway evaluates applicable routing rules in this order:
- Scope — More specific rules are evaluated before broader rules (employee → team → organization).
- Priority — Within the same scope, enabled rules are tried in ascending priority order (lower number first;
0before10). - Conditions — The request must satisfy the conditions defined in Rule Builder (CEL Expression Preview shows the generated expression). Conditions can match request attributes such as Request type, Provider, Model, or Team.
- Targets — When a rule matches, the gateway selects one of its targets. If several targets are configured, their weights determine how traffic is distributed (weights must sum to
1). - Fallbacks — If the selected target cannot process the request, the gateway tries the configured fallback targets in order.
The first matching rule is applied. After a rule matches, rules with lower precedence are not evaluated.
If no routing rule matches, the gateway keeps the provider and model selected by the user or specified by the API client.
Access checks#
Routing rules do not override provider access settings. After a destination is selected, the gateway verifies that:
- the provider is Active;
- the selected model is enabled;
- the requesting user, team, or agent is allowed to use the provider via Credentials & Roles — Allowed providers;
- applicable budgets and rate limits have not been exceeded.
If these requirements are not met, the request is rejected or a configured fallback is attempted.
Configure a routing rule#
Before you begin#
Complete these steps before creating a routing rule:
- At least one provider is Active.
- Required models are enabled on each provider detail page.
- Users or applications that send traffic have target providers assigned in Credentials & Roles — Allowed providers.
- For fallback or load balancing, configure two or more provider/model destinations.
Add routing rule#
-
Open Config → Providers, go to the Routing Rules tab, and click + ADD.
-
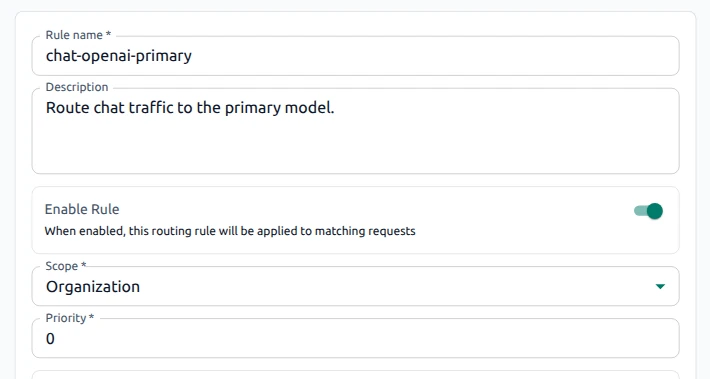
Configure the rule settings:
- Rule name — Enter a unique label, for example
chat-openai-primary. - Description — Add an optional note for administrators.
- Enable Rule — Turn on to evaluate the rule for matching requests; turn off to keep the rule without applying it.
- Scope — Select Organization to apply the rule to all organization traffic, or Team or Employee to limit the rule to a specific scope. For Team or Employee, specify the team or employee in Scope ID. For a team-level override of an organization rule, see Scope-specific overrides.
- Priority — Numeric value; lower numbers are evaluated first within the same scope (
0before10). Use distinct values so overrides are unambiguous.
- Rule name — Enter a unique label, for example
-
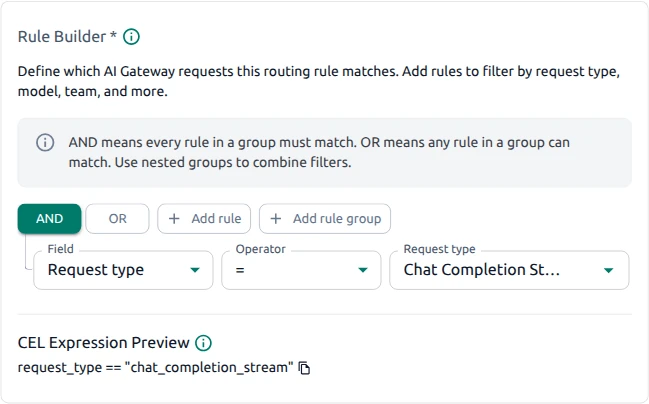
Define which requests the rule matches in Rule Builder.
- AND — All conditions must match.
- OR — At least one condition must match.
- Add group — Create nested logic.
Choose AND or OR for the current group. Use Add group to create nested logic when needed, then click Add rule and select the field, operator, and value.
Review CEL Expression Preview before saving. If no rules are added, the preview shows No expression. See Avoid empty conditions and Request types for Chat and API.
For examples of single conditions, OR logic, and nested groups, see Routing Best Practices.
-
Configure the preferred destinations in Targets.
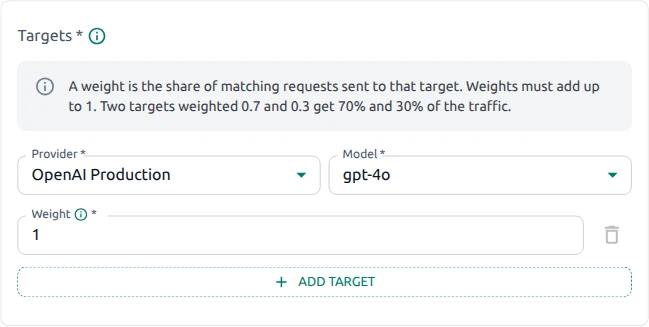
Targets define where matching requests are sent.
- Select a Provider and Model (only enabled models appear).
- Specify a Weight value. For a single target, use
1. For multiple targets, weights must sum to1(for example0.7and0.3). The gateway picks one target per request by weight (not a sticky session). See Weighted split across providers. - Use + ADD TARGET to add additional destinations for load balancing.
-
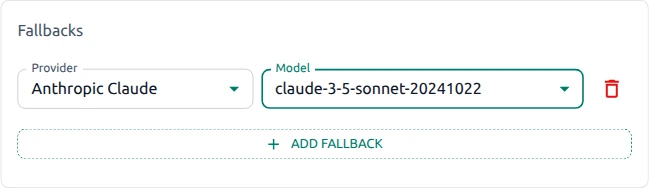
Configure fallback destinations in Fallbacks (optional but recommended).
Fallbacks define alternative destinations used when the selected target cannot process a request.
- Select a fallback Provider and Model.
- Use + ADD FALLBACK to add additional fallback entries. The gateway tries them in order until a request succeeds or no fallbacks remain.
-
Click SAVE to create the routing rule.
Optional actions:
- Click CANCEL to return to the Routing Rules tab without saving changes.
Avoid empty conditions#
An empty Rule Builder typically matches all requests in that scope—including embeddings, images, speech, and other types, not only chat.
- Always set at least a Request type to Chat Completion Stream when OptScale Chat must match. See Request types for Chat and API.
- Avoid organization-wide “always match” rules unless you intentionally want every request type rewritten.
Verify routing#
Verify that the routing rule is configured correctly and matching traffic follows the intended path:
- Open Config → Providers → Routing Rules and verify that the rule is Enabled and that Scope, Priority, and target Provider / Model match your design.
- Click the rule to open the detail page and verify that the Condition expression matches the intended traffic, and that Targets (and Fallbacks, if configured) list the expected destinations.
- In Config → Credentials & Roles, confirm the test user can access every target and fallback provider. See Allowed providers.
- From Chat, send a few requests that match the rule Conditions.
- In Traces, confirm the applied routing rule name, Provider, and Model match the rule Targets (or a configured Fallback if the primary target failed).
- Optional: test a fallback scenario and confirm in Traces that the expected fallback provider and model are used. See Configure a target provider with a fallback.
For worked examples with sample values, see Routing Best Practices.
Routing checklist#
Before you rely on a rule in production:
- In Rule Builder, set Request type to Chat Completion Stream to match OptScale Chat requests. See Request types for Chat and API.
- Set Priority so lower numbers run earlier within the same scope—see How routing rules work.
- Ensure target weights sum to
1when multiple targets are configured. - Confirm that the user has access to every target and fallback provider/model. See Allowed providers.
- Prefer Disable over Delete when pausing a rule you may reuse.
- After saving the rule, send a Chat or API request and confirm the provider and model in Traces.
Troubleshooting#
If routing does not apply as expected
- Confirm that the rule is Enabled and was saved without validation errors.
- Confirm Scope and Scope ID match the user or team sending traffic.
- Confirm Conditions match real requests—compare CEL Expression Preview with the request type, model, and attributes shown in Traces.
- Confirm no rule with a lower priority number (higher precedence) matches the same traffic first within the same scope. Remember scope is evaluated before priority (employee → team → organization).
- Confirm target models are enabled on the provider detail page and providers are assigned in Credentials & Roles.
- Confirm target weights sum to
1when multiple targets are configured.
Manage routing rules#
Routing rule details#
The routing rule detail page contains:
- Summary cards — Enabled status, number of targets, priority, and creation date.
- Summary — Rule name, identifier, description, enabled status, scope, scope identifier, priority, creation date, and last update date. A copy control is available for the rule identifier.
- Condition — The matching expression that determines when the rule applies. A copy control is available for the condition expression.
- Targets — Preferred provider and model destinations and the routing weight for each target. A footer shows the total number of targets.
- Fallbacks — Alternative destinations used when preferred targets are unavailable. When none are configured, the section displays No fallbacks.
Use EDIT to modify the rule and REFRESH to reload the page.
Edit routing rule#
1. Open the routing rule for editing using one of the following options:
- On the Routing Rules tab, in the Actions column of the rule row, click the
 Edit icon.
 - On the routing rule detail page, click EDIT.
2. Review the pre-populated configuration and update the required settings. See the field descriptions in Add routing rule.
3. Click SAVE to apply the changes.
Optional actions:
- Click CANCEL to return without saving changes.
- Click DELETE to start the routing rule removal process. See Delete routing rule.
Delete routing rule#
1. Open Config → Providers and select the Routing Rules tab.
2. Remove the rule using one of the following options:
-
On the Routing Rules tab, in the Actions column of the rule row, click the
 Delete icon, or
 -
Click the rule name to open the detail page, click EDIT, then click DELETE on the edit form.
3. Confirm the deletion when prompted.
The rule is removed from the organization and is no longer applied to matching requests.